Bread & Tomatoes

 
fig. a:  Sunday morning loaves

fig. a: Sunday morning loaves

Semolina-Sesame Loaf

20% semolina (preferably semola rimacinata, an extra-fine “re-milled” or twice-milled Italian variety)

80% bread flour

15% levain

85% water

2.5% sea salt

3.0% toasted sesame seeds

fig. b:  levain landscape

fig. b: levain landscape

This semolina-sesame loaf has been my latest obsession over the last couple of weeks. It was inspired by the semolina loaves that were a specialty of some of the truly old-school Italian-American bakeries of New Jersey back in the day. For a while, I worked in a wine store in Northern Virginia that used to import dozens of loaves of bread from Jersey every Thursday. I got pretty hooked on the flavour at the time. Those loaves tended to have sesame seeds generously sprinkled on top. In this case, I put an especially generous amount of toasted sesame seeds inside the loaf.

Yesterday, I celebrated the arrival of my latest batch of semolina-sesame bread by making a somewhat old-school spaghetti dinner with lots of garlic and a couple of anchovies in the sauce. I wanted to have something that was saucy and savoury, something that would need some sopping up, something that was just begging for a freshly baked loaf of crusty bread.

This time of year, fresh tomatoes that have any flavour to them are a little hard to find, for reasons that should be obvious. Therefore, from the tail end of fall until the early days of summer, I tend to seek out the tastiest canned tomatoes I can find for many of my home cooking projects, including the making of tomato-based pasta sauces. Without being ridiculous, use the best tomatoes you can afford. Spending a few bucks on a can of tomatoes might seem extravagant to some, but, unless you grow your own, the best fresh tomatoes can also be pricey (rightfully so, in most cases), and a good can of tomatoes packs a lot of potential into its tight, tinned confines.

If you happen to be in the States, keep your eyes open for these sweet, delicious Stanislaus 74-40 tomato filets from California. (They’re worth buying for their anti-Brand X propaganda alone!).

fig. c: 74-40 or bust!

fig. c: 74-40 or bust!

If you’re in Montreal, it’s nice to see that Bianco DiNapoli’s phenomenal canned tomatoes—also from California, but this time organic, too!—are readily available.

I like breaking open an extra-large can like the one you see above and then parceling its contents in a variety of ways for a variety of different projects, at least one of which will usually be a pasta sauce of some kind. The one I made yesterday was quick, easy, and super-satisfying:

Simple Umami-Rich Pasta Sauce

1 28-ounce can canned tomatoes (or equivalent), crushed by hand in a bowl

a generous glug of extra-virgin olive oil

1-2 oil-packed anchovies (preferably packed in olive oil)

1-2 medium to large cloves garlic, minced

1 generous pinch crushed chile flakes

salt to taste

Heat your olive oil over medium-low heat. When your olive oil is warm, add the anchovies and stir with spoon until they have broken down and melded with the olive oil. Add the chile flakes and cook 15-30 seconds, until aromatic. Add the garlic and cook for another 15-30 seconds, until the garlic becomes aromatic and it takes on a hint of golden colour. Add the tomatoes with all their juices and simmer for 20-30 minutes over low heat. Season to taste with salt before serving.

Serve over spaghetti, with freshly grated Parmesan, some garlicky homemade breadcrumbs (if you got ‘em!), and some freshly torn basil leaves.

When you serve this sauce with pasta, don’t be stingy. There should be a little sauce left in the bottom of the bowl that’s calling out for a crusty bread.

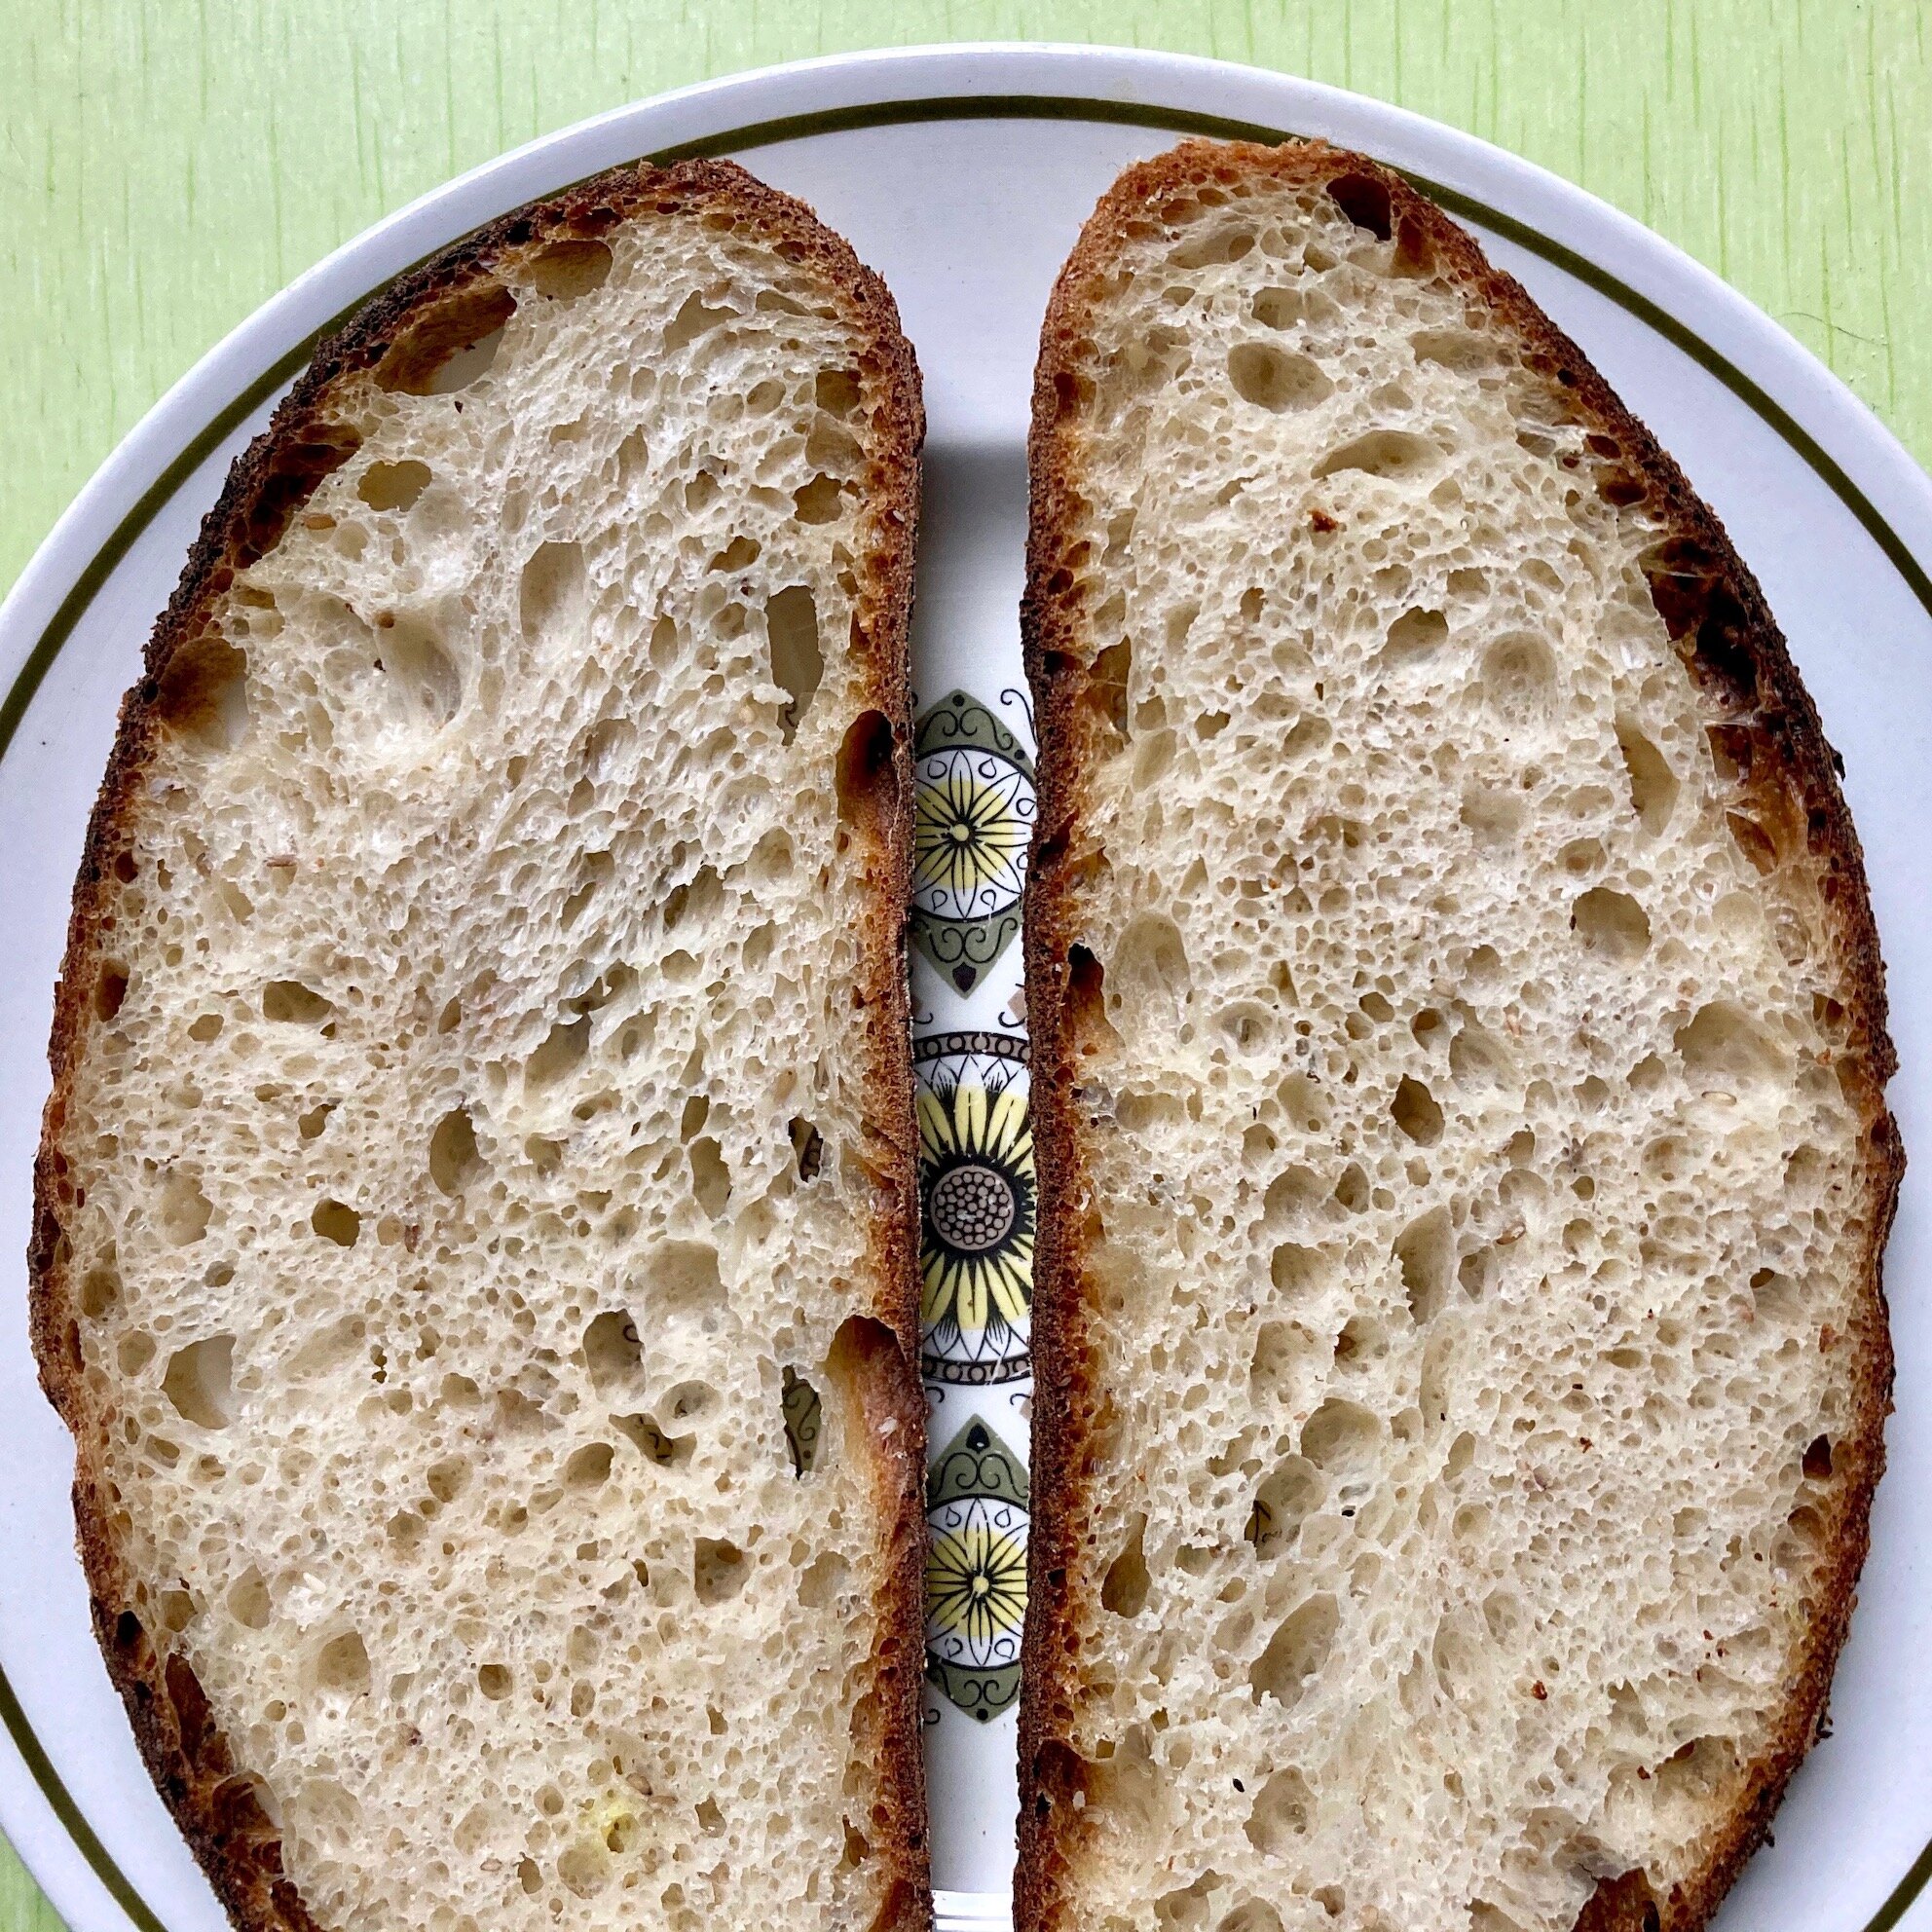
Of course, crust isn’t everything. There’s also something to be said for structure, and for a tender, flavourful crumb, like these two specimens:

fig. d:  semolina-sesame crumb #1

fig. d: semolina-sesame crumb #1

fig. e:  semolina-sesame crumb #2

fig. e: semolina-sesame crumb #2

Using semola rimacinata instead of standard semolina is one of the big reasons the crumb on this loaf is particularly tender and fine. Plus, semola rimacinata is a great product to have around the house—it’s fantastic for making homemade pasta.

Anyway, although they’re hard to see, there’s plenty of flavour-packed toasted sesame seeds in this loaf, which only add to the taste sensation. I used to toast my sesame seeds myself, but it was a bit of a hassle, especially because sesame seeds are delicate and easily scorched if you don’t watch them carefully. These days I just buy large bags of Japanese toasted sesame seeds—we use them all the time when we cook Japanese dishes, and they’re perfect for bread baking.

This bread is delicious on its own, phenomenal with butter, and simply crazy with red sauce.

aj
Pizza, Bibles, and Blossoms


If Ken Forkish's The Elements of Pizza:  Unlocking the Secrets to World-Class Pies at Home (10 Speed Press, 2016) hasn't officially been anointed as the New Pizza Bible, that distinction seems imminent.  

I was already a fan of Forkish's earlier book Flour Water Salt Yeast (10 Speed Press, 2012), which is an excellent, and meticulously detailed general text on bread baking.  It also tells a great story:  how Forkish left a corporate career of almost 20 years in Silicon Valley to embark upon a new career as a bread baker; how he was inspired to do so by reading a profile of the legendary French baker Lionel Poilâne in the pages of Smithsonian that a friend had lent him (a profile that also left an impression on me way back in 1995); and how this eventually led to the founding of Ken's Artisan Bakery in 2001, a bakery that quickly became a mainstay of Portland's food scene, and one that has since built a national reputation.  

fig. b:  FWSY's pizza margherita

fig. b:  FWSY's pizza margherita

One of the the things I loved about Flour Water Salt Yeast was its devotion to pizza:  roughly 60 pages out of a 260-page text.  The book's full title is Flour Water Salt Yeast:  The Fundamentals of Artisan Bread and Pizza, after all.  And this section of the book was no mere afterthought--Forkish, like others before him, had gone from being a bread fanatic to being a pizza fanatic.  In fact, he followed up on the success of Ken's Artisan Bakery by opening Ken's Artisan Pizza in 2006.  His thoughts on pizza were based on 5+ years as a full-scale pizza professional, as well as years as a pizza lover before that. 

fig. c:  detail, back cover of Flour Water Salt Yeast

fig. c:  detail, back cover of Flour Water Salt Yeast

Forkish's pizza section featured the same passion and attention to detail that characterized the rest of his book, and along with the teachings of people like Jim Lahey and Anthony Falco, it proved to be an important step in my pizza education.  But you've gotta hand it to the guy.  He could have gone back to the well and just expanded upon the lessons he'd already laid down in Flour Water Salt Yeast.  Add a little more detail.  Develop some funky new recipes.  That's it, that's all.  Ba-da-bing, ba-da-boom.  Instead, he embarked upon a series of pizza pilgrimages.  He went back to the sources.  He interviewed the masters.  He observed closely.  He asked questions.  And doing so forced him to scrap much of the pizza wisdom he'd developed over the years.  It forced him to part ways with a number of the pizza truths that he'd believed to be self-evident, including one that had been a cardinal belief of his:  that the fundamentals of artisan bread baking and artisan pizza making were identical.  Hell, that was much of the premise of Flour Water Salt Yeast.  

What he learned was that from the perspective of an Italian master pizzaiolo this was categorically untrue:  bread was bread, and pizza was pizza.  There might be some overlap between the two, they might share a similar skill set, but bread and pizza were fundamentally different.  Pizza dough needed to be made differently, fermented differently, and handled differently.  And, of course, the baking of pizza was also altogether different.

fig. d:  hands of a master pizzaiolo:  Enzo Coccia

fig. d:  hands of a master pizzaiolo:  Enzo Coccia

The book that resulted, The Elements of Pizza, represents a major leap forward for Forkish and for the ever-growing body of pizza lit.  It is written with passion and conviction, and with a great deal of personality.  It is sufficiently comprehensive, beginning with the great traditions of Italy, Naples and Rome, where Forkish locates "the soul of pizza," but also encompassing a number of the most important American traditions:  New York, Trenton, NJ, New Haven, Detroit, and a whole host of new-school pizza enthusiasts (like Roberta's, Motorino, Emily, and, indeed, Ken's).  And it is meticulously detailed and filled with all the inspiration an aspiring pizzzaiolo could ever ask for.  Beginning with chapters on Ken's pizza pilgrimages and his breakdown of pizza styles, it follows this up with a number of very helpful chapters, such as:  8 keys to unlocking the secrets of top-notch pizza crusts; sourcing ingredients and acquiring necessary pieces of equipment; methods; and pizza dough recipes; before offering another 120 pages worth of actual pizza recipes.

But the emphasis is placed quite squarely on achieving Perfect Crust Forever, as it should be.  Top-shelf ingredients and creativity aren't worth a hoot if the pizza crust isn't sublime.  That utterly transcendent crust is what Forkish experienced on numerous occasions over the course of his pizza pilgrimages, and it's that utterly transcendent crust that is the ultimate goal of The Elements of Pizza.  One can get a sense of what Forkish is after, and just how elusive this goal might be, in his opening chapter, "The Soul of Pizza."  Here, Forkish describes a trip he paid to Pepe in Grani in Caiazzo, Italy, roughly 30 miles outside of Naples.  There, Franco Pepe, a third-generation pizzaiolo, has established a new pizzeria (Pepe in Grani just opened in 2012) that has quickly developed a reputation for being one of the world's very best, because of its utter respect for tradition (the dough is naturally leavened, it is hand-mixed, and Pepe uses no refrigeration in its preparation), on the one hand, combined with its willingness to push the envelope when it comes to toppings (fig jam with grated Conciato cheese, anyone?), on the other.  But it's Pepe's pizza crust that is the true star of the show, and to which Forkish directs most of his attention:  

These were flawless pizzas.  [Pepe's] reputation is well deserved.  The crust had a very thin layer of crisp on the outside and the bottom, and a feathery light crumb inside the rim.  It was almost weightless.  The inner base of the crust was very thin and perfectly leopard-spotted on its bottom...
...Franco's crust tasted of lactic fermentation--a flavor that's sometimes described as milky and fruity, and similar to what you get with a ripe liquid levain...  His is a very well-fermented dough, with a beautiful balance of flavors, and as they might say in Italy, it is highly digestible ("digestibility" is loosely defined, but widely regarded as beings a benefit of long-fermented, naturally leavened pizza and bread).  We put that to the supreme test by eating five more pizzas... [my emphasis]

"Flawless."  "Feathery."  "Weightless."  "Highly digestible."  These are not words used to describe your typical pizza pie.  Forkish is pursuing transcendence, and what makes his book so captivating is his conviction that one can reach similar heights at home, using a conventional oven.

One of the recipes that caught my fancy right off the bat was Forkish's Zucchini Blossom Pizza recipe.  I'd been kind of obsessed with the idea of zucchini blossom pizza ever since I received Saveur's 2010 issue devoted to Los Angeles, which featured a glorious photograph of Pizzeria Mozza's Squash Blossoms & Ricotta pizza on its front cover:

fig. e:  Pizzeria Mozza's zucchini blossom & ricotta pie

fig. e:  Pizzeria Mozza's zucchini blossom & ricotta pie

I made it out to L.A. not long after that issue came out, but I never made it to Pizzeria Mozza and I've never been lucky enough to find a squash blossom pizza anywhere else. With zucchini blossoms plentiful here in Montreal's farmers' markets right now, though, I knew I had to give Forkish's recipe a try.  But first I had to think about my pizza dough.

When it comes to using Forkish's book to unlock the secrets of pizza, there's no better place to start than with his simplest dough:  his "I Slept In But I Want Pizza Tonight" Dough.  It's a simple recipe (as long-fermentation pizza doughs go), and it's designed to be easily achievable within a day--within half a day, actually.  This is the recipe that most people are going to turn to first, for obvious reasons, so it's gotta be good.  I went ahead and gave it a spin.

"I Slept In But I Want Pizza Tonight" Dough

350 grams water

10 grams fine sea salt

0.5 grams (roughly 1/8 tsp) instant dried yeast

500 grams white flour, preferably Caputo 00 flour

olive oil

special equipment:

digital scale

dough tubs

instant-read thermometer

baking stone or baking steel

Use a digital scale to weigh 350 grams of 100º F (38º C) water into a 6-quart dough tub.  Measure 10 grams of fine sea salt, add it to the water, and swirl it around until dissolved.  Measure instant dried yeast and add it to the water, allowing it to rest there for a minute to hydrate, before swirling it around to fully dissolve it.  Add the flour to the water-salt-yeast mixture.

Mix the dough by hand, stirring it thoroughly to fully integrate the ingredients and create a single mass of dough.  Then use the pincer method [consult Forkish's books for details] to cut the dough up into sections, before folding it back together into a unified mass.  Continue for just 30 to 60 seconds.  The target dough temperature at the end is 82º F (28º C).

Let the dough rest for 20 minutes, then knead it on a work surface that's been lightly dusted with flour.  Knead for 30 to 60 seconds, until the skin of the dough is very smooth.  Place the dough ball seam side down in a lightly oiled (olive oil) dough tub.  Cover with a tight-fitting lid.  Let the dough rise at room temperature for 1 1/2 hours.  This is the first fermentation.

Divide and shape the dough into 3 dough balls [consult Forkish's book for details].  Moderately flour a work surface about 2 feet wide.  With floured hands, gently ease the dough onto the work surface.  Dust the entire top of the dough with flour, then cut it into 3 pieces (or 5, depending on the style of pizza you're aiming for).  Shape each piece of dough into a medium-tight ball [following Forkish's instructions], working gently and being careful not to tear the dough.

Place the dough balls on a lightly floured baking sheet or dinner plate, leaving space between them to allow for expansion.  Lightly flour the tops, cover with airtight plastic wrap, and let rest at room temperature for 4 to 6 hours.  This is the second fermentation.

After the second fermentation, you're ready to make pizza.  Refrigerate the dough balls if you need to delay making your pizza for a bit.  Just let them come to room temperature before making pizza.

[based very, very closely on Ken Forkish's recipe of the same name in The Elements of Pizza]

The verdict:  this was a fantastic recipe.  Everything worked like a charm, and the resultant pizza crust was everything one could hope for:  light and crispy, with a perfect amount of chew, a lovely cornicione, and loads of flavour for a relatively "quick" pizza.  This was not Franco Pepe's "flawless" naturally leavened pizza, but it was supremely good for a "I Slept In But I Want Pizza Tonight" dough.

Important caveat:  Forkish is adamant about letting his pizza doughs rise at room temperature, just like Fraco Pepe, both during the first fermentation and the second fermentation.  This is something that is common in the greatest pizzerias in Italy, but highly uncommon in North America.  I agree that letting the dough rise at room temperature during the first fermentation is a great idea.  However, after trying Forkish's room temperature method for the second fermentation on a couple of occasions and meeting with difficulties, I've gone back to refrigerating my doughs during this part of the process.  The primary reason is that my kitchen is rarely "room temperature."  We don't heat our kitchen a great deal in the winter, and we never use air conditioning in the warm-weather months.  Our windows are often open, and our kitchen is usually either warmer than room temperature or cooler than it, and our humidity is often fairly high in the spring and summer.  In other words, the conditions in our kitchen are much too volatile to allow for a 4- to 6-hour second fermentation without monitoring the process obsessively and risking failure every time.  What's been working for me is giving the dough balls a 5-6-hour (or more) second fermentation in the refrigerator, then allowing them to come to warm up at room temperature for about 60-90 minutes before forming, stretching, and baking them.  My dough balls haven't been over-proofed, and 60-90 minutes at room temperature has allowed them to relax to the point that they become very easy to handle.

fig. f:  zucchini blossom pizza 1

fig. f:  zucchini blossom pizza 1

Now, here are the instructions for making Forkish's ricotta-stuffed zucchini blossom pie, a version of which you see pictured above:

Zucchini Blossom Pizza

[Makes one 12-inch thin-crust pizza]

1 dough ball

1/2 cup fresh ricotta cheese

1/4 cup grated Pecorino Romano cheese

1 egg yolk

zest of 1/4 lemon

sea salt

10 mint leaves, snipped or chopped

6 zucchini blossoms

fragrant extra-virgin olive oil

1/3 cup tomato sauce

In a medium-size bowl, mix the ricotta, Pecorino Romano, egg yolk, lemon zest, a pinch of salt, and half of the mint leaves with a fork until completely blended.  Cut off the zucchini blossom stems, gently open the blossom, remove the pistil, and stuff each blossom with some of the cheese mixture (roughly 1 tbsp per blossom).  Close the blossom back up and seal the petals with a twist.  Set aside on a plate, and gently rub with a thin film of olive oil to keep the petals from scorching in the oven.

When your pizza dough has been properly stretched and formed, apply the tomato sauce.  Place the blossoms on the tomato sauce with their tops pointing in, making sure to space them in such a way as to make a lovely radial pattern.  Drop any extra ricotta into the spaces between the blossoms.  Scatter the remaining mint leaves over top.  Bake your pizza following Forkish's instructions for roughly 5-7 minutes total.

[based on the essentials of Ken Forkish's recipe in The Elements of Pizza]

fig. g:  zucchini blossom pizza 2

fig. g:  zucchini blossom pizza 2

Not bad, huh?  And, again, this was made with the very same "I Slept In But I Want Pizza Tonight" Dough recipe featured above.  I hadn't actually slept in, but I definitely hadn't started any other long-fermentation dough recipes one or two days before, and I woke up with a hankering for pizza.  My dough balls were in the fridge by 9:00am.  By 6:00pm I was back at home, firing up my oven, and beginning to pull my dough balls from the refrigerator.  By 7:15pm or so, the pizzas coming out of the oven were divine.

But it was that zucchini blossom pizza that stole the show.  It was just so beautiful and the flavours were magical:  the blossoms, the ricotta, the mint, the crust.  Highly recommended!

An important note about baking in a conventional oven:  Place a baking stone or baking steel in your oven, and crank it as high as it will go.  I've been using a baking stone with good results for years.  Recently I switched to using a baking steel instead, and the results have been exceptional (and I'm not the only one who's experienced this).  If you can afford it, you might want to consider the combination baking steel/griddle--it's a truly ingenious contraption, it works remarkably well in both capacities, and it comes very highly rated.  Ten minutes before you're ready to bake your pizza, use your broiler on full blast.  When you throw in your pizza, switch it back to conventional baking mode for 2-3 minutes.  For the final 1-2 minutes of your bake, turn your broiler back on to achieve some lovely blistering on the top side.

That's it for now.  You'll find more on Forkish's The Elements of Pizza here in the pages of "...an endless banquet" as I work my way through its various styles.

Behold the New Pizza Bible!  My love of pizza blossoms anew.

aj